This is an old revision of the document!
Table of Contents
V2 AIO Box Assembly page
Introduction
So, you've just received your kit. Please read this page to assemble properly your kit.
You may notice some small differences beetween the pictures and your own kit but it's mostly the same for the build.
If you have some questions, feel free to ask : mailto:adrien.grelet@gmail.com.
Step 1 : Clean the parts
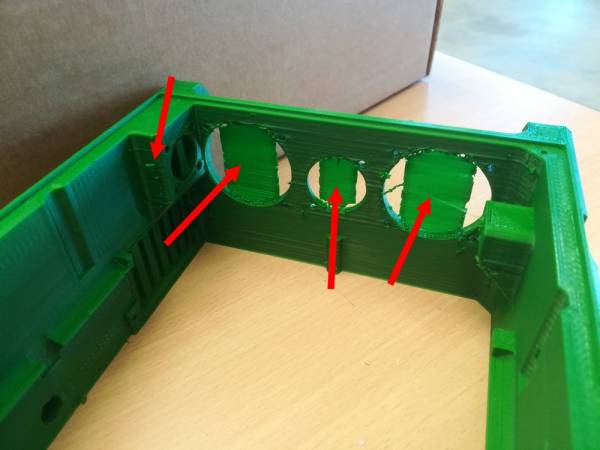
The printed parts come with some supports you'll have to remove with a plier and cut the extra material with a well sharpened knife.
On the picture it's just the main zones you'll have supports, but check the entire parts to clean them.
Also, on the CNC parts, even I've checked them, you can have some burrs you can easily remove by filing the edges.
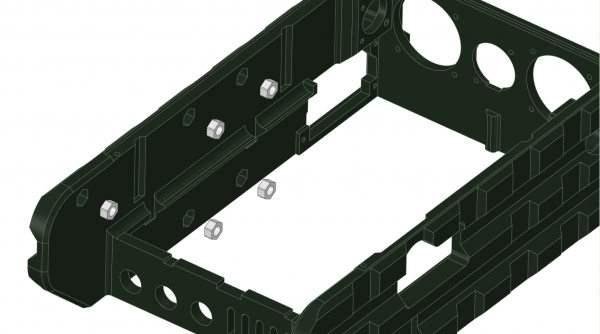
Step 2 : Install M5 nuts for the accessory port
| Item | Quantity | Note |
|---|---|---|
| AIO box | 1 | |
| M5 nuts | 5 |
Use some pliers if you need to install the nuts for future accessory port. If you think this can be a bit too loose, don't hesitate to glue the nuts.
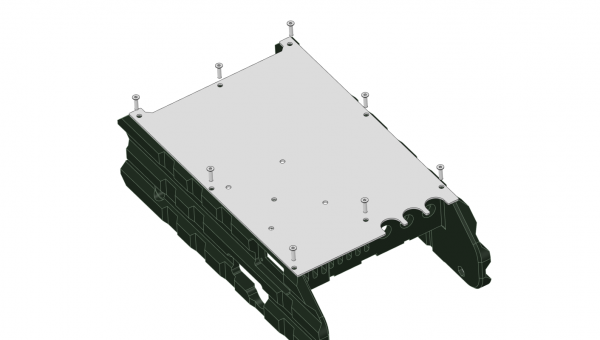
Step 3 : Mount the heatsink and the base plate
| Item | Quantity | Note |
|---|---|---|
| PLAQUE_DESSOUS | 1 | Base plate in alumium |
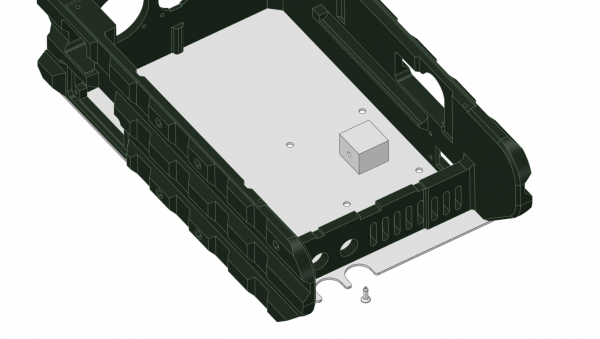
| Aluminium Heatsing | 1 | |
| TFX03/012ZN | 8 | M3 countersunk head, 12mm long |
| TFX03/08ZN | 1 | M3 countersunk head, 8mm long |
First of all, screw the 12mm screws to attach the bottom plate on the printed box. Mind the position of the plate, the 3 “U” shapes are for the 3 switchs you will install at the end.
After that, screw the heatsink on the plate with the 8mm screw. Be careful to have the M3 tappered hole on the left side (it'll be easier to install the thermal switch). Also take care to install the heatsink parallel with the box.
Step 4 : Install the DC fans and RJ45 socket
| Item | Quantity | Note |
|---|---|---|
| DC fan | 2 | with filtered cover |
| RJ45 socket | 1 | |
| TCX03/08ZN | 2 | M3 standard head, 8mm long |
| TCX03/12ZN | 2 | M3 countersunk head, 12mm long |
| M3 spacer | 2 | |
| M3 nut | 2 |
Step 5 : Install SO-239 socket and ground banana connector
| Item | Quantity | Note |
|---|---|---|
| Banana ground connector | 1 | |
| SO-239 socket | 1 | |
| TCX03/016ZN | 8 | M3 standard head, 16mm long |
| TFX03/08ZN | 2 | M3 countersunk head, 8mm long |
Step 6 : Install the step down converter and the Raspberry Pi
| Item | Quantity | Note |
|---|---|---|
| 16mm spacer | 2 | |
| PINCE_REGULATEUR | 1 | printed part |
| DC stepdown | 1 | |
| Foam | 1 | Piece of foam to protect stepdown |
| TFX03/08ZN | 4 | M3 countersunk head, 8mm long |
| TCX03/08ZN | 2 | M3 standard head, 8mm long |
| M3 spacer | 4 | |
| M3 nut | 2 |
Don't forget to screw the thermal switch before installing the RPI !
Step 7 : Install side plates
| Item | Quantity | Note |
|---|---|---|
| Left side plate | 1 | aluminium part |
| Right side plate | 1 | aluminium part |
| TCX03/08ZN | 8 | M3 standard head, 8mm long |


